
Hi everyone! Tonight I wanted to share with you all a layout that is packed full of tonnes of techniques! This was my first attempt at a grungey mixed media male layout and I have hopefully pulled it off! WARNING this is a very photo heavy post
So here is the layout and I have used a photo of 5 of my brothers together being their usual "special" selves LOL.

Here are some closeup piccies for you to see some of the amazing details of this layout.

This fabulous Chipboard title from A2Z Scraplets I have coated with black gesso and followed that with some Perfect Pearls from Ranger in Turquoise, Red & Sapphire. After applying the Perfect Pearls Powder I have sprayed some Oil Slick Chalkboard Mist from Tattered Angels but I held it about a metre above the chipboard so it simply left black spots dropped over the surface. Outlining the edges with sharpie was the final touch this title needed :)

I have added lots of finishing touches including some Tim Holtz Ideaology.

Some more fabulous A2Z Scraplets Chipboard goodies shown here including Cogs & Twisty Barbed Wire. You can also see a transparency clock pictured here from the Kaisercraft 13th Hour Acetate Shapes.

Some close ups of the fabulous textures added to the already amazing Dreamer Collection Paper from 7 Dots Studio! Finnabair is one of my favourite idols in this industry and I am so honoured to be working with such amazing papers she has created for us all and I hope I have done them justice.

I really thoroughly enjoyed creating this page and playing with all the fabulous textures. Here are some quick tutorials on how some elements were created.

Starting off with this amazing paper from the 7 Dots Studio Collection Dreamer. I just love using bubble wrap in my creating and the colours of this paper worked perfectly with my photo as well!
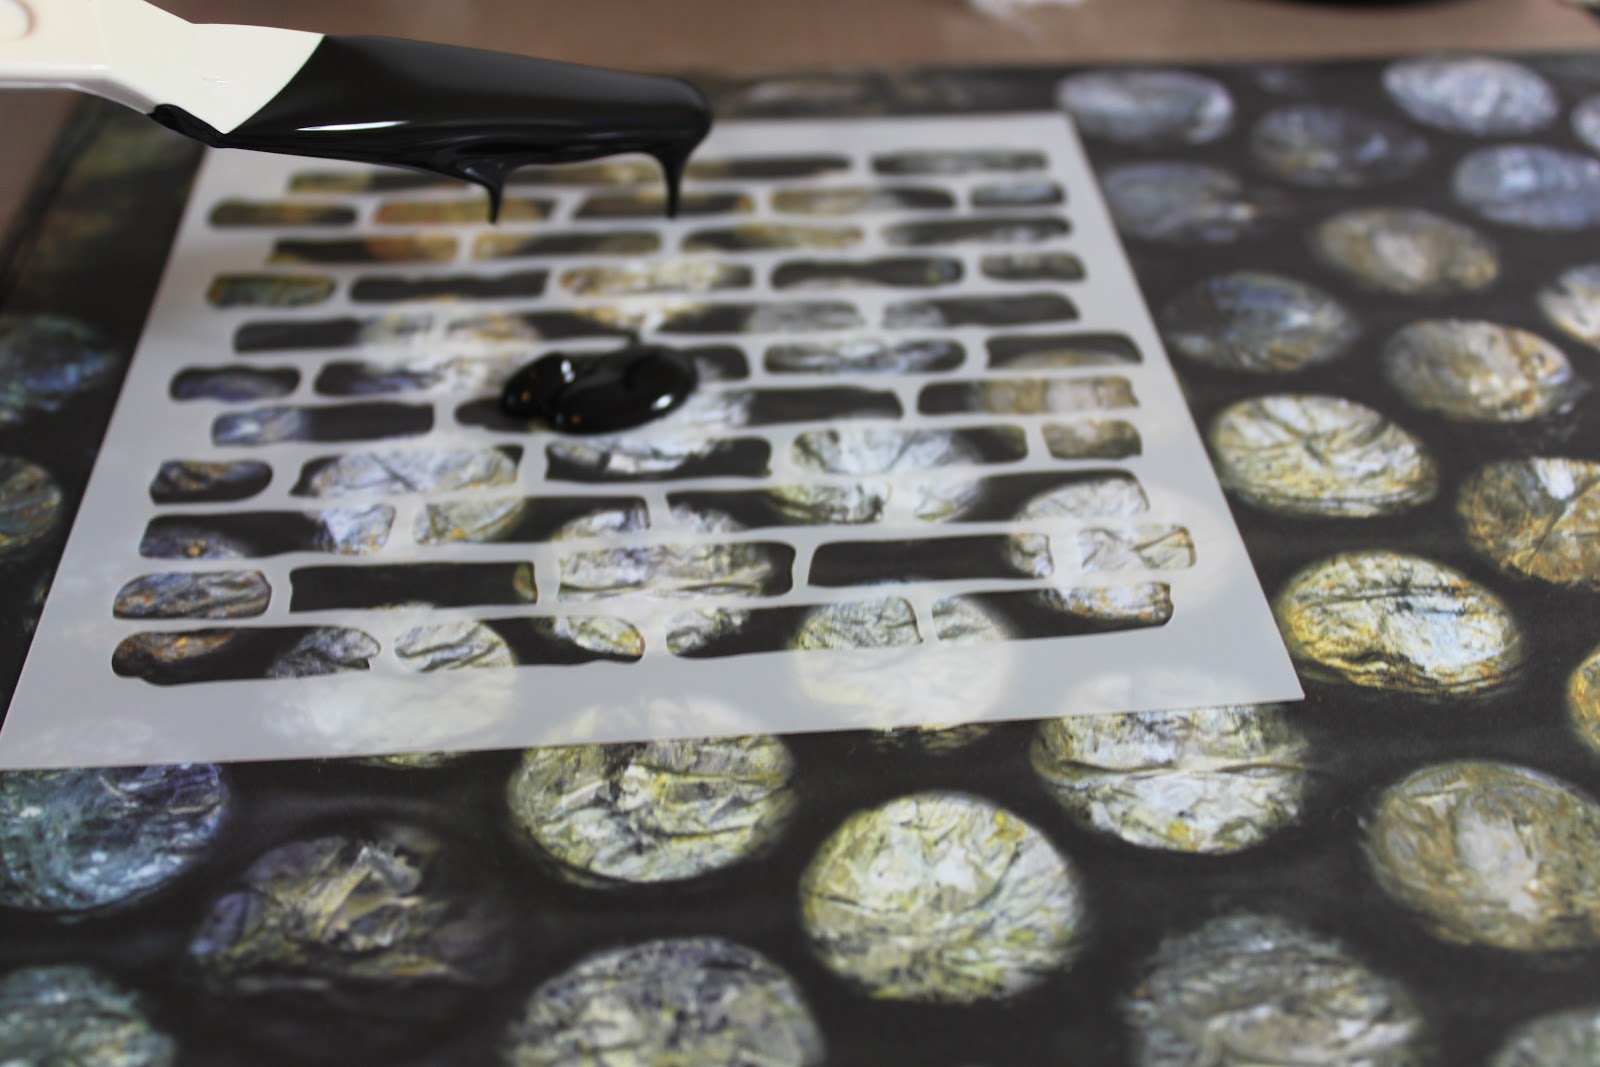
First up I have used my Crafters Workshop Brick Template with some Black Gesso. I have smoothed this over the template with a pallette knife and then I carefully lifted off the template to reveal the amazing brick pattern and set aside to dry.
I then started to play with my elements I wanted to use. Firstly I just knew that these cogs & barbed wire from A2Z Scraplets would be perfect for this masculine layout. Firstly I coated all the chipboard pieces with black gesso. I then began adding texture and other interest.

For this cog I grabbed some toilet paper and peeled off 1 ply thickness to start applying. I used a small paint brush with my gesso to make the toilet paper stick and then added more toilet paper using a clean paint brush with Sapphire Glimmer Glam and working in rough and circlular motions to create lots of texture. I then left this cog overnight to dry so I could trim the edges with my craft knife. An eyelet in the centre added a final touch and helped work in the other subtle silver elements on the page.

For this next cog I have used a new product to my stash which is Matte Goosebumps spray from Tsukineko. This was really fun to watch work and even more fun to let dry on my craft mat as it beads so well on that! LOL Anywho back to the tutorial, this fabulous product looks like a Glossy Accent type product yet in a spray bottle and when sprayed it leaves a goosebump yet matte finish. I thought this would work fabulously with my layout theme so I sprayed a little. Can you see the goosebump texture? And the beads on my craft mat? Was very cool! Anywho I put this one to the side and tried to work out how I could add some colour! The texture was not as textured as I hoped so inking was out of the question so I sat it to side to ponder.

I had one cog that I had left bare and decided to spray it with some Burnt Red Tattered Angels Glimmer Mist. I again was not 100% happy with this one so I put it to the side and pondered until I saw my fabulous collection of WOW Embossing Powders sitting in front of me and I simply knew what to do.

With such fabulous intricate designs, I did not want to add too much embossing powder to the surface plus I wanted to create a very distressed look. For both these cogs I decided to take my WOW Embossing Powder Call Me! Stamp Set and inked the surface very roughly with some embossing ink. For this red cog I have added some Skyline Grey Puff Embossing Powder from WOW. This powder is fabulous to work with and the puff always astounds me with how amazing the texture is!

This next cog needed a little bit of colour to break up the solid matte black so I have again used the WOW Call Me! Stamp but this time I have used Cable Car Red, Bay Area Blue & Tea Garden Green all from the fabulous Suzy West Collections! This technique was very simple. After stamping your embossing ink simply sprinkle a small amount of each colour randomly until all areas are covered and then tap off and heat. Voila! I actually didn't tap off the excess of this one because I again wanted a very distressed look.

Now that the Gesso on my paper was dry I could start to add other elements to create more texture on my page. Firstly I have cut up small fragments of cheesecloth and really ripped and unthreaded them a lot before dipping into black gesso and getting very messy LOL. I have also splattered lots of the black Gesso all over the paper to add more texture.

For a bit more texture I have used my WOW Call Me stamp again with some Skyline Grey Puff Embossing Powder. I only wanted to stamp a small area of the stamp onto my page so I have used my sponge dauber to roughly ink my stamp.

Just that little area of embossed writing here and there was the final textures the base paper needed now I simply need to add more colour and glimmer because after all, I am a girlie layout kinda gal usually LOL I cannot give everything up :)

I have used some Tattered Angels Glimmer Mists including English Ivy, Sapphire Blue, Burnt Red and Abominable Snowman.

There were sooooo many elements and techniques used in this layout that I could go on for hours but I hope you have been inspired to try some grungey or mixed media projects yourself. Be sure to step outside your comfort zones if you see something you want to try!
Until next time! Happy Scrapping!
Amy Prior xxx